WordPress Globals & Database Functions
When you need to store a lot of data, especially when there may be different data stored for each unique user of your website, you will likely find that using WordPress options becomes more complicated than it is worth. The next step is to understand how to use WordPress database functions, but before I can move on to this, I first need to explain WordPress global variables to you. Since a lot of information is stored in WordPress about a variety of different things, you can actually access most of it through the WordPress global variables. For example, on each WordPress post/page, there is a global variable that contains all of the information for that page like the title, meta information, content, and even custom data specific to that page (it's like options for just for pages). One of the global variables in WordPress is $wpdb. I am going to focus on this one in particular because it is actually what I will use for storing information to the database! $wpdb (or other global variables) can be made available anywhere within WordPress by simply using the GLOBAL PHP command, followed by the global variable name, and then a semicolon. An example of this simple code to call this global variable can be seen below:
By using this simple PHP command, we get access to everything WordPress has stored in that global variable. Before I dive too far into $wpdb, I want to mention a few other WordPress global variables that you may find useful. If you want to provide different content on your websites based on whether a visitor is a member of your site or not, you can access WordPress global variables to find this out and to get information of the members.
Additional Global Variables in WordPress can be found here: http://codex.wordpress.org/Global_Variables Now, on to $wpdb! Unlike the other global variables I just mentioned in the box above, $wpdb is not a simple variable with a saved numerical or text value. $wpdb is actually a PHP class. This is yet another subject that could be talked about for quite a while, so I am just going to sum this up for you and tell you the important parts that you need to know to use this - think of a PHP class as a collection custom PHP functions, except you can only access them through the class variable. With that said, $wpdb contains WordPress database functions that save you a ton of work compared with trying to use databases outside of WordPress. There are a ton of different functions available to use in this class, so I just want to talk about a few of them for you so you can actually make use of this in a practical situation. Get more info about functions available in this class here: http://codex.wordpress.org/Class_Reference/wpdb I had mentioned previously that it is important to prevent malicious code from your users from ending up in your database. This is where that becomes important. Certain functions in this class will automatically protect you from malicious code while some will not. Instead of showing you the ones that do protect you, I thought it might be better to demonstrate some that do NOT protect you so I can show you how to use them properly. Before we can use the database functions for WordPress, we need a database table to use. For this purpose, I will revisit something that I showed you in the cPanel training lesson: creating a database table. Login to the cPanel for your website and go to phpMyAdmin. If you have more than one database on your hosting account, select the WordPress database for the site you are using. Have a ton of WordPress databases on your account and don't know which one to pick? Try this... First, select a database to try. Then, click on the wp_options table in the database. One of the first rows in that table should be for the option_name 'siteurl'. The option value for that row is the domain name for the website that uses this database table. I have shown a picture of this below:
Once you know you are in the right database, you want to create a new table in that database. When you first click on the database for the site (in the left-hand menu), it will open a page that lists all of the available tables in that database. Below that, you will find an area to create the new table (as pictured below):
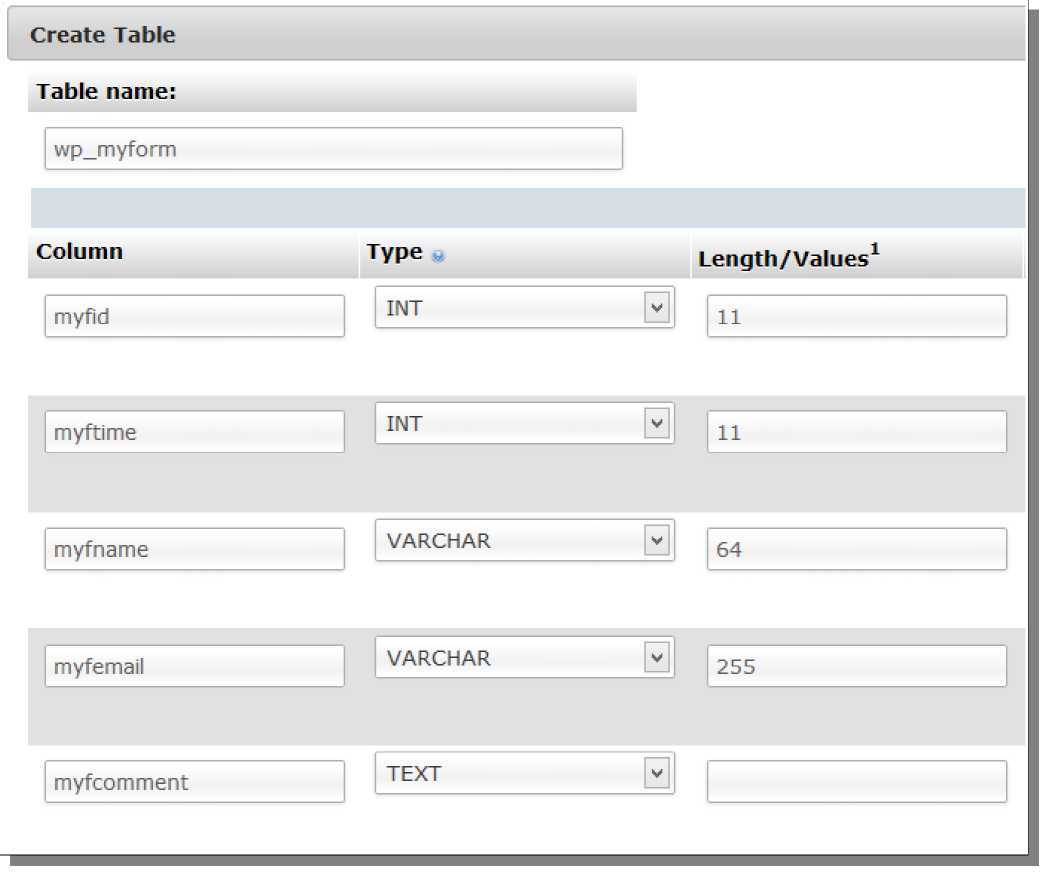
For this lesson, I am going to create a new database table by the name of wp_myform, and this table will have 5 columns. Notice the prefix that I have used for this database table name: wp_ This prefix is already in use with the existing database tables that WordPress created. It is a good habit to continue this naming structure when you create your own tables (just be sure that the name for the table hasn't been used before). Once we start using PHP code to work with this table, you'll see why the prefix is used for the table name. When you click on the Go button, a new window will open asking for information about the database table. I have shown a series of two pictures below that shows the information that I am entering to create this table. This first picture should be the initial area of the window that you will see:
For the first picture, there are three sections of information to enter: Column, Type and Length/Values. You can see all of the values I have entered for the 5 rows - just duplicate this information for your table. Next, scroll in that window to the right, so you can see all of the sections of information that are available. We are looking for the sections Index and A_I, which are almost all the way to the right-hand side of that window. In just the top row, I want to select Primary as the Index and select the checkbox for A_I (as pictured below):
Once you have duplicated the information you see here, just scroll to the bottom of the window and click the Save button. Now that we have a database table to work with, we can proceed to the PHP code and using $wpdb. $wpdb->queryUltimately, this one database function in this class can actually be used for anything you want to do. Other functions help to simplify certain types of database actions, but this function can still do all of them if you know how to use it. The real difference between using this function and others is that you need to be able to write your own MYSQL code for the database queries. Although this requires a bit of extra work and effort, knowing how to do this will allow you to use PHP and MYSQL even outside of WordPress, if needed. To start, I want to show you how to put new information into a database table using this function. I have shown how this work in the example below:
There are three lines of code that I have used in this example. Each is explained below:
To sum all of that up for you, first you're writing the MYSQL query that references the database table name and column names with placeholders. Then, you're creating an array that stores the data that will be used to replace those placeholders. Finally, you're using $wpdb functions to process that MYSQL query with the data array. The end result is that this information is permanently saved in the database as a row! After running the code above and then browsing my database table, you can see the row of information that was created:
As you can see from the picture above, the myfid value was automatically filled in for me, even though I didn't provide that column name and value in the MYSQL query. This happened because the A_I box was checked for this column when it was created in the database table. The next row that I add to this table will have a myfid value of 2, and so on. $wpdb->get_rowThe next function that I want to talk about is $wpdb->get_row. This class function is used to retrieve a single row of information that was previously saved in the database. The important thing to remember about using database and retrieving information is that information can be retrieved in a number of different ways - depending on the information you have stored in your database. In this example, I am going to retrieve the information from this database using the myfid column value that was automatically created for me. For the previous information that was saved, I know that the myfid was saved as 1, so I can easily retrieve that row by simply knowing that number:
In this example, I first create the MYSQL query that will retrieve the row of information. This begins with SELECT * FROM. This means that I want to retrieve all (*) all of the columns from the database table. Next, I provide the database table name with the table name prefix included. Then I use the MYSQL command WHERE to indicate that I want to specify a test to use to find the information this database. For this example, I want to retrieve the row that has value of 1 for the column myfid, so I simply use myfid = 1. Once I have the MYSQL query completed, I want to run that query using the $wpdb->get_row class function. First, notice that I didn't use $wpdb->prepare this time. Why not? Because there is no user input here that might have malicious code. Basically, if you use placeholders in your query, then you should use $wpdb->prepare. With $wpdb->get_row, I have provided two arguments: the first is the MYSQL query variable that I created before, $sql, and the second is ARRAY_A. This second argument is telling the function that I want the results returned as a named array. Also notice that I have saved the return from $wpdb->get_row as a variable, $row. This variable will actually be an array that will contain the saved information from the database! Now, I use the print_r command to output the contents of the array to the browser (just so I can see them). You could also reference each value in the array individually and echo them along with HTML code to create a customized output for this information - I will also be getting to an example of this at the end of this tutorial. $wpdb->get_resultsWhat if there was more than one row of information in my database that I wanted to return? Even more importantly, what if I didn't know ANY of the information in the database to use to retrieve it? I'm going to show you how to accomplish both of these things here. First, if I were to revisit the $wpdb->query example that I used to enter new information into my database and run that a second time, I would end up with two rows of data in my database table (as pictured below): So, how would I retrieve both of these rows of information, especially if I didn't know any of the information to use in the MYSQL query (like the numbers for the myfid column, for example)? $wpdb->get_results allows us to retrieve more than one row of information from a database table with a single MYSQL query, and we can use a somewhat different query from the last example to retrieve this information without knowing the myfid values. This example shows how to accomplish this:
The first thing that I need to point out here is the MYSQL query that I created. This time, instead of using the WHERE command with a column name and value, I simply left that out! The rest of the query is being used to sort the results, so that part isn't even entirely necessary. For example, just this MYSQL query would retrieve all of the rows in that table:
However, I added the MYSQL command ORDER BY to sort the results. I then specify a column to sort by (this column will be sorted based on the values of each row in that column). Finally, I use the MYSQL command DESC to specify the direction to sort the results - this means descending, so I am sorting results using the myfid value starting with the highest value (the most recent row created) and working down to the lowest value. ASC could optionally be used instead of DESC if you want to sort in ascending order. This sorting applies to both numbers and letters - when using values that have text instead of numbers, they will be sorted alphabetically in the direction you specify. Next, I execute the MYSQL query using the $wpdb->get_results class function. This receives the same arguments as the $wpdb->get_row function. I then output the contents of the entire saved array, $row, so you can see the information that gets returned. If you notice from the array that is output to the browser, there are actually two more arrays inside of the main array! Each of these inner arrays represents one of the rows of information from the database table. © PHP Training Guide >>> Back to TABLE OF CONTENTS <<< | |
| Views: 687 | |


| Total comments: 0 | |